


Hence,
THE BACK OFF RICE BABY!

Tutorial:
This is SO simple. Or, as my mother would say: "It's just straight lines!"
You'll need:
- 1 rectangular piece of fabric (mine was 14" x 11")
- Thread to match
- Small embroidered fabric
(mine was on canvas, and was 3" x 4")
- 3 cups rice
- 2 Tablespoons dried lavender
- Just a few drops of essential oil
(optional: I used lavender and lemon)
STEP ONE:
Determine where you want your embroidery to be, and trace your embroidery fabric with a fabric pencil.
Then, with your fabric pencil, draw the same shape 1/4" smaller, inside the original.
Cut out smaller shape.

Place your embroidery fabric under the cut-out hole and with a zig-zag stich, sew around the embroidery.

STEP TWO
Fold your fabric in half, hot-dog style, right sides together.
Sew a straight line 1/4" from the edge.
Iron your seam open.

STEP THREE:
On one end of your tube, fold the ends in about 1/2"
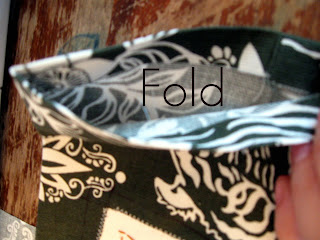

Sew a straight line about 1/4" from the newly folded edge

STEP FOUR:
Fill bag with about 3 cups rice (NOT INSTANT RICE!), 2 Tablespoons of dried lavender, and a few drops of essential oils of your choice
*Be sure NOT to add too many drops of oil as you don't want your bag to become greasy.

STEP FIVE:
Repeat step four on the open end of the bag so that both ends match

STEP SIX:
Place rice baby in the microwave for 1-2 minutes (NO LONGER!) and place on aching area.

Let's pretend it was my head aching, shall we? ;)
I like this. One of my coworkers uses one of these all the time. HOWEVER, you did not have to cut out a hole where you are placing your embroidered piece. You could have just simply sewn it on top of your fabric since there is no purpose for the hole underneath. Not cutting the hole would mean your piece wouldn't have a chance of coming apart there. It is just a couple of straight lines...right?!
ReplyDeleteMadre
I didn't want the edges of the embroidered piece to fray and I'm not talented enough to figure out how to do that!
ReplyDeleteWhat a great idea!! Thank you so much for stopping by my blog and leaving me sweet comments, I was browsing through your blog and love it!!! I am now a new follower :)
ReplyDeleteHope you have a great Wednesday!
xoxo,
Lindsay
oh, I could get that slogan tattooed on my forehead somedays. love your blog. found you on ucreate!
ReplyDeleteWhat a GREAT idea!! I also saw you on U-Create. Love the pic at the end!! I need to make one of these. :)
ReplyDeleteAlison
http://oopsey-daisy.blogspot.com/